

Before we get started making a squeeze page on this tutorial, I highly recommend using Google Chrome for your web browser. Then make sure the browsing data is cleared. I do not recommend using any other web browser. Anytime that you are working for a long period of time, on AdCreatorDesign, and it freezes, this means you need to clear your browsing data.
Click on the 3 dots circled in yellow below on your browser, then click "More Tools," then click "Clear browsing data," then click on the Blue, "Clear Data" button. You are ready to go after the browser is done clearing the browsing data.

Browse Templates and Pick One Out
Log into AdCreatorDesign with your Username, (Not Your Email Address!) and password and click on the Green button on the Left-Hand side menu that says, "Browse Templates."

*SELECTING A SQUEEZE PAGE TEMPLATE
Let's start by clicking on Squeeze Pages [145] and browse through the pages for a template for your first design!


I think I will choose the maroon and white, Squeeze Page template on page #7, 9th template down. I will click on it to load it into my editor.

I am going to upload an image now.
Upload a picture from your computer by clicking on the "Upload Images" button on the left-hand side of the menu under the main menu bar. Click on the image you wish to upload and click on "Open" and the image will appear in the upper left hand corner of the editor.

*RESIZING IMAGES
To resize your image: click on the image to highlight it with orange lines around it with 3 tiny orange boxes on the corners and one circle in the upper right-hand corner. If you can't see the corners, drag the picture down with the cross cursor until you see a corner. It may already be highlighted in orange and ready for you to put your cross cursor on the orange box until it turns into double arrows. 1) Then drag this down as far as you can without losing the image and 2) then drag it up with the cross cursor. Repeat these 2 steps until you have the size you need for your image. Don't forget to save your work!!

*USING THE TEXT EDITOR
Click on the 2 Double T's in the upper left-hand corner of the top menu bar to open up the text box into your squeeze page editor.
Use the "Text Options Box" to choose your Font, Color, Font Size, Alignment. Place the text where you see fit by clicking on it to highlight and orange box around the text, then clicking and dragging it the text. SAVE YOUR WORK!!!
 *ADDING YOUR AUTORESPONDER CODE
Copy the HTML code for your form that you wish to direct your capture leads to. It is in the back office of your favorite autoresponder. We will be pasting the code into the autoresponder box on the top main menu in the editor with a little yellow envelope/folder icon.
Copy the HTML code for your form that you wish to direct your capture leads to. It is in the back office of your favorite autoresponder. We will be pasting the code into the autoresponder box on the top main menu in the editor with a little yellow envelope/folder icon.
Log into your autoresponder and click on your "Campaign Manager" or "List."

Select the Campaign you want to get a form code (autoresponder) from.
 Click On Capture Page Forms.
Then click on "Capture Forms" in the drop down list.

Then click on "Get Basic HTML form code or the Java Script code - which ever you prefer. If the Java Script doesn't work then use the Basic HTML code.

Copy and paste the code into the AdCreatorDesign autoresponder box.

The autoresponder box is at the top menu bar with the yellow envelope/file on it. Paste your code into this box and click the "Submit" button. It will look like a blank white box but the code is in there. After clicking on the "Submit" button, highlight the blank white box and click on the autoresponder yellow top menu icon. You will see the code in it you just pasted to the box. This is handy tool to have in case you want to look up, what code is in what box.

Don't forget to save your work!

Now you must view your squeeze page and make the changes as needed.
Click on "My Designs," then click on the squeeze page you are working on ONCE, then click on"Your Squeeze Page Link" shown below and it will open up into a new tab on your web browser.
Click on "My Designs," then click on the squeeze page you are working on ONCE, then click on"Your Squeeze Page Link" shown below and it will open up into a new tab on your web browser.

Click on the "Edit Design" to edit your images, text, etc.

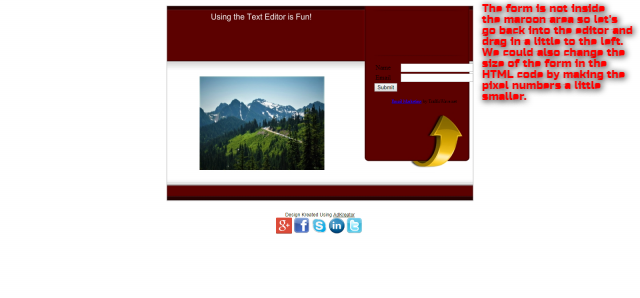
You can see below, the form is not all of the way inside of the maroon area so we will want to drag it a bit to the left in the editor section. Save your work and view the tab again and refresh it to see your changes. If your changes don't show up when you refresh it, you will need to clear you browsing data on the browser.
 To change the size of the pixel numbers in your form, we will go to the Editor and click on the autoresponder box in the menu bar after highlighting the blank white box.
Now view your page in the next tab and refresh it to see if the changes solved the problem.
You can see that it is fixed in the diagram below.

*ADDING ANIMATIONS
To add an animation all we need to do is go to animatedimages.org to pick one out.
They allow you to use their images for commercial use. All you need to do is link back to them by putting their link on your page. Scroll down to the categories that are in alphabetical order and pick out what you want to look at.
I'm scrolling down to "F" to pick out the "Flowers" images section.
I am going to pick out the pink daisies with the white bird in it.
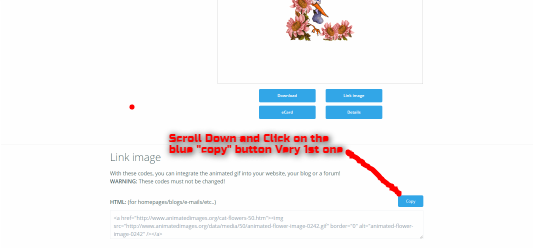

Then scroll down to the first "Link image" and click on the Blue "Copy" button. Then paste the animation code into the autoresponder box in your editor of your squeeze page. Then click the "Submit" button to save it.

Then click on the white box and drag it to a spot it looks like it might fit in.

View your squeeze page in the other tab , Refresh it and see it the animation fits properly where you put it.

The animation is overlapping the form code so I am going to move the top, white autoresponder box up a little and the bottom, white autoresponder box down a little in the editor.

I am going to go to my tab with my page and refresh it again to see if the changes were successful. I found that I had to clear my browsing data after doing this so many times. So make sure you save you work before logging out of AdCreatorDesign before clearing your browsing data.

As you can see, it fits perfectly!
*ADDING A HYPERLINK TO AN IMAGE OR TEXT
If you want to add a hyperlink to an image such as the photograph of the mountains or the text above it, I have a special code to do this with.
<a href='http://www.adkreator.com/adkguide.pdf' target='_blank'><img src='http://www.adkreator.com/images/blank.gif'
height=150 width=400 border='0' /></a>
Just replace your link with my Adkreator guide link http://www.adkreator.com/adkguide.pdf and don't touch anything else. Leave the code intact. Don't delete the single quotation marks around it. I will show you how to do the rest with screen shots.

Paste your code into Word or Google Docs and save it. Then copy and paste it into the autoresponder box and click the "Submit" button to save it.
Drag the box over the text or image you want to be clickable. Save Your Work!

View the squeeze page in a new tab by clicking on the link. Test your page by clicking on the image or text you dragged your box over with the code.

I clicked on my image on my page after refreshing it and it went to my Adkreator Guide like I wanted it to.
If you click on your image or text you put the code over and it doesn't work, check the code and check your link. The code has to be exactly like the one I pasted above.
If you get really stuck, Skype me for help "barbdel" with no quotation marks, or message me on Facebook and say you are from AdCreatorDesign or Adkreator.
~Barbara
If you are thinking about making a squeeze page of your own, please click over to my AdKreator.com site to make your own from one of our templates, then you can easily make your own and add to your website.
~Barbara
If you are thinking about making a squeeze page of your own, please click over to my AdKreator.com site to make your own from one of our templates, then you can easily make your own and add to your website.
No comments:
Post a Comment